
Partway through the process of creating a batch of dragon wings.
Hi, everybody – I thought that in honor of Halloween (my favorite holiday), I’d share with you a behind-the-scenes peek into what goes into making a pair of Catwings. And since I’m going to illustrate this post with photos of the process of making a custom order of dragon wings for five cute puppies, maybe I should also start referring to them as Dogwings… or simply be equal-opportunity and call them Petwings. 🙂
I named them Catwings because I originally created them for my cats, and because “catwings” rhymes with “bat wings” which I thought was cute. But a surprising number of dog people have been buying wings from me lately, and they look just as cute on small-to-medium size dogs as they do on cats.

My newest order of custom-printed satin, ready to be transformed into Catwings!
Usually I get my wing artwork custom-printed on cotton or satin by my favorite custom-printing company, Spoonflower. The quality of their work is fantastic, but the turnaround time is typically at least two weeks, so if I need to produce something more quickly I hand-transfer the images to fabric using Transfer Artist Paper (TAP). TAP works very well and can be used to transfer images onto almost any kind of material (apparently even wood, glass, or metal, although I haven’t tried that yet), but it is a bit spendy. And the high temperature required means I can only transfer onto cotton, not onto delicate artificial fibers that would be apt to melt.
Next I either iron or glue the printed fabric to heavy interfacing. Spray adhesive for fabric is difficult to manage, especially when the fabric is soft and drapy, but is necessary when I’m using fabrics with which I can’t use a high heat iron.
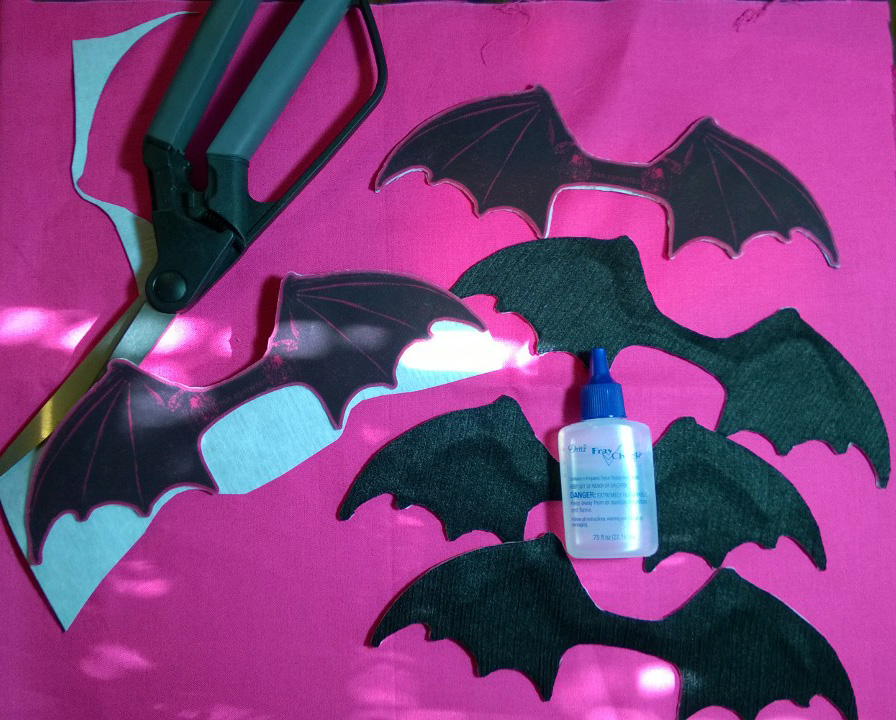
Then I “draw” around the edges of each wing with Fraycheck. This is especially necessary when I’m using fray-prone fabrics such as satin, velvet, lamé, etc. After the Fraycheck is dry, I carefully cut out each wing.

The printed side of the wings is complete, and I’ve laid them on top of the black satin I’m going to use for the other side. Rilian Finn is very interested in the glitter glue!
I typically make one side of each pair of wings from printed fabric (printed with either the bat/dragon wing design, or the angel wing design) and the other side from a fancy material such as brocade, velvet, satin, taffeta, or metallic lamé. In order to prepare the lining fabric, I also attach it to heavy interfacing, using either a hot iron or spray-on fabric adhesive.
The next step is to create the wire “bones,” and glue the layers together. The wire is rather springy and uncooperative, so it can be difficult to get the wire to stay put in the right place long enough for the glue to dry. To solve this problem I use double-sticky fabric tape to hold it in position, and good-quality fabric glue to attach the layers of fabric together. An aside about fabric glue… you would not believe how many types I tried before finding one that doesn’t stain the fabric and that has a lot of “gluing power.” Not all fabric glues are created equal!


It is necessary to make sure the wire is positioned far enough from the edges of each pair of wings that I don’t accidentally sew over it and break a needle when I am stitching the two sides together. I also try to give the “bones” a shape that reflects the shape of the wings. I didn’t used to do this, but in experimenting with different approaches I decided it looks better this way.
 I lay the wings flat under a stack of heavy books to dry, which takes a couple hours.
After the glue is thoroughly dried, I cut out the lining side, by cutting very carefully around the printed side. During this step, the most important thing is to not cut the lining side too small, and to not accidentally snip off the wing tips. Both mistakes are surprisingly easy to make.
Partway through cutting out the lining side on the last pair of wings.
After I have cut out the lining side, I go around all the newly-cut edges with Fraycheck. One simply cannot have too much Fraycheck.
After the Fraycheck is dry, it is time for the most difficult (and my least favorite) part of the entire process – sewing the two sides together using a narrow zigzag stitch around the entire edge. This step is an almost-constant battle between me and my sewing machine, which would like nothing better than to suck those little wing-tips into its inner workings and chew them to death. Possibly I need a less bloodthirsty sewing machine.


After stitching the two sides together I use fabric pens to color any little exposed edge of interfacing that might show, to match the color scheme of the wings.


Now it is finally time for one of my favorite parts – decorating the wings with glitter! I have tried various different approaches to this, and upon careful consideration have decided that more is more. MUST HAVE MOAR GLITTER! So now I usually decorate not only all around the edges on both sides, but also trace around each “feather” on the angel wings and along the “bones” on the dragon/bat wings. Sometimes I even add a contrasting or complimentary color of glitter just along the very edges of the wings.


After the glitter-glue dries on one side, I finish the other side. Usually it takes a few hours to dry completely.

Barley supervises the process.
Then it is time for the final step… sewing on the button and elastic loop. I love the look of heart buttons for this, but they are sadly hard to find – I’ve only been able to find them in red and pink. I was excited to be able to find them in HOT pink, to match my customer’s desired color scheme!


Usually I use gold or silver elastic to make the loops, but this time I used black to match the wings. I use heavy thread to sew on the loops and buttons, to make them nice and sturdy.
That’s it – voila! Beautiful Catwings (aka Dogwings or Petwings) to transform your lovable little buddy into a dangerous dragon, horrible Cthulhu, or seraphic angel.
A very Happy Halloween to you and your pets! May you all look cute (and/or scary), have fun, stay safe, and enjoy many delicious treats.

I love these so much!!!!
LikeLiked by 1 person
I love this Jenny, so very interesting! and funny! I also love your talented assistants!
LikeLike